Project Management guide
Introduction
This document describes the steps that project managers need to follow in order to setup development environment for their projects.
Information for team members
As project managers, you will need to provide enough information for your team members so that they can connect to the assigned EC2 instances and work on the projects. Please check the following checklist for preparation. You should be able to find out how to get these information in this document.
- Customer Project account ID
- Role Name to assume from Isengard Account to access AWS Customer Account (if allowed by the customer)
- AWS Region where AWS Transform for mainframe Standard Delivery Environment is deployed
- EC2 instance ID(s) created from BluAge-Developer-Instance EC2 launch template
- Create a Temporary password for each Developer EC2 instance (please do not share temporary password to the whole team)
Developer Guide
AWS Transform for mainframe Developer EC2 Instance
Each developer will be assigned an EC2 instance for project modernization. Project manager needs to create those instances before developers start working on the project. For security reasons, all these instances are within a private network, and developers will connect to the instances through SSM. The following steps will guide project managers on how to create the instances.
Prerequisite
Project manager needs to install CLI and session-manager-plugin on their AWS laptop:
- https://docs.aws.amazon.com/cli/latest/userguide/getting-started-install.html
Developer EC2 Instance(s)
Project manager will use a pre-defined launch template to create EC2 instances for developers. This launch template has already set up necessary configurations including network interfaces, CPU, RAM, etc. Unless there are specific requirements on the new EC2 instance(s), there will be no need to change any configurations from the template.
Pre-defined EC2 configs
- vCPU: 8
- RAM: 32G
- Disk Drive: 200G SSD
- Port 8080 is open to all dev EC2 instances (for current testing purpose)
- No Internet access
Create Developer EC2 Instance(s) from Launch Template
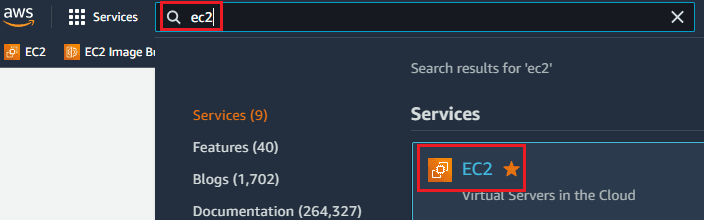
- In the customer account, search “EC2” in search box, and navigate to EC2 page.
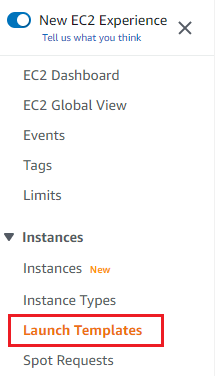
- On left hand side, click on “Launch Templates” under “Instances”.
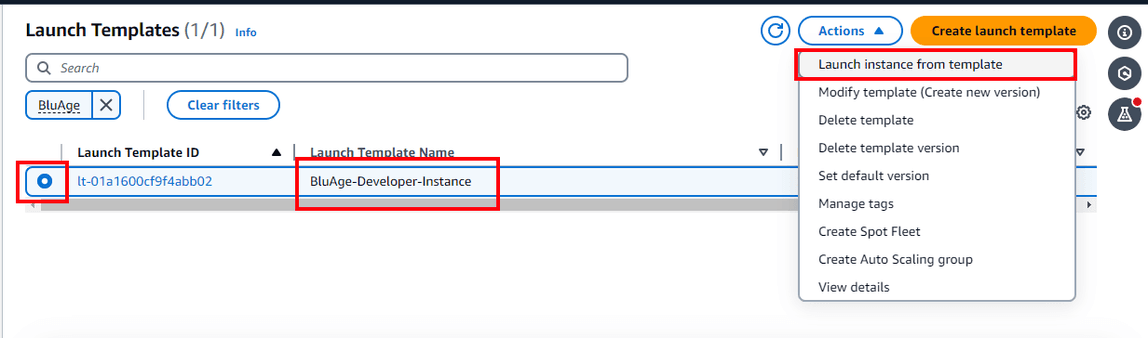
- There should be one launch template ready to use. Launch template name is “BluAge-Developer-Instance”. Check this template, and click “Actions” → “Launch instance from template”.
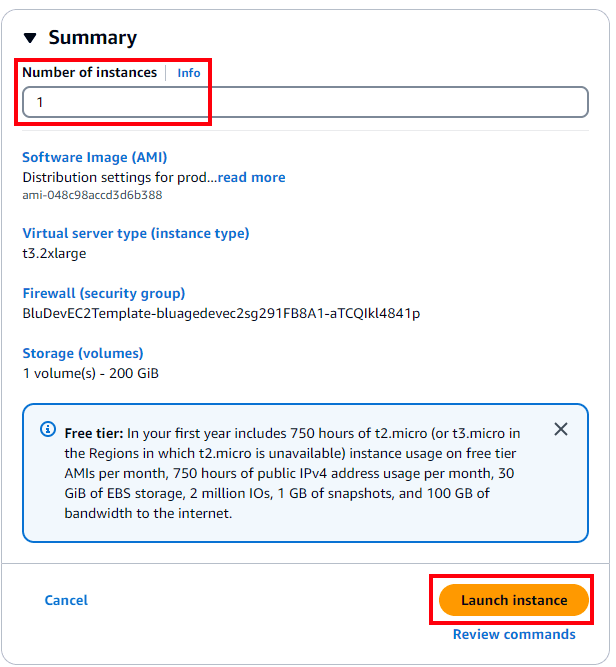
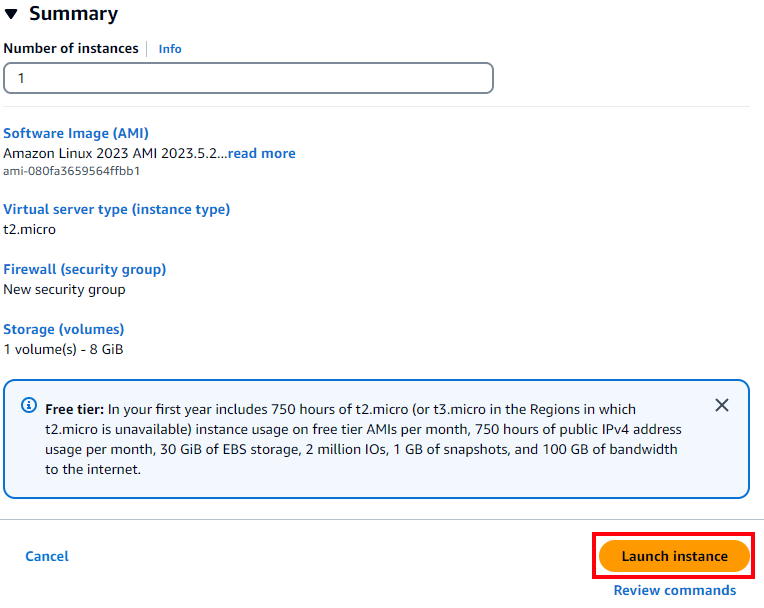
- By default, there will be only one EC2 instance created. If more instances are needed, project manager can update “Number of instances” under “Summary” on the right hand side. Then click on “Launch instance” to create the instance(s).
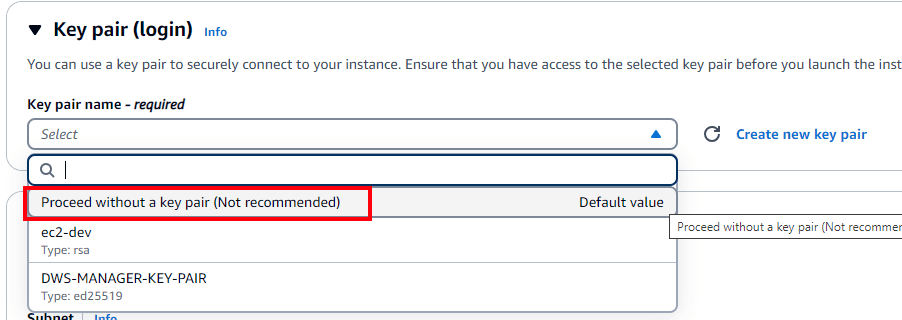
- A window will pop up and ask for key pair information. Choose “Proceed without key pair”, then click on “Proceed without key pair” button.

- The pop-up window will be closed. Click on “Launch Instance” button to create the instance(s). If the creation is successful,
there will bea “Success” message shows up, along with the EC2 instance ID(s).
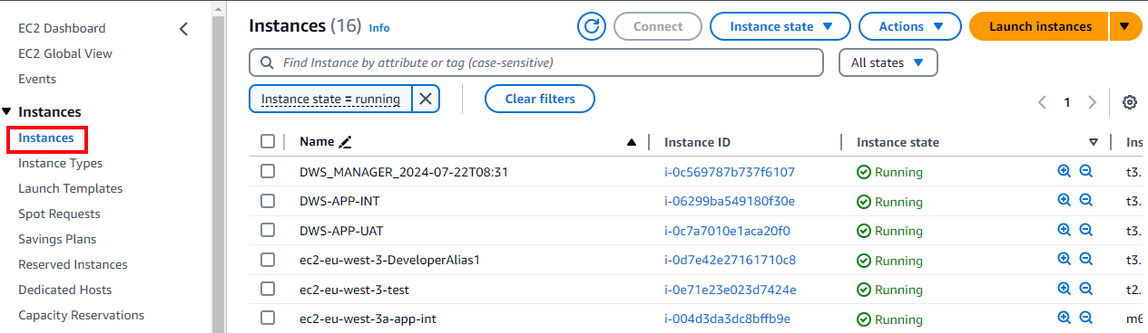
- Navigate back to the EC2 main page, click on “Instances” under “Instances” on the left hand side. It will show all EC2 instances. If “Status check” is “2/2 checks passed”, that means this EC2 instance is ready to use.
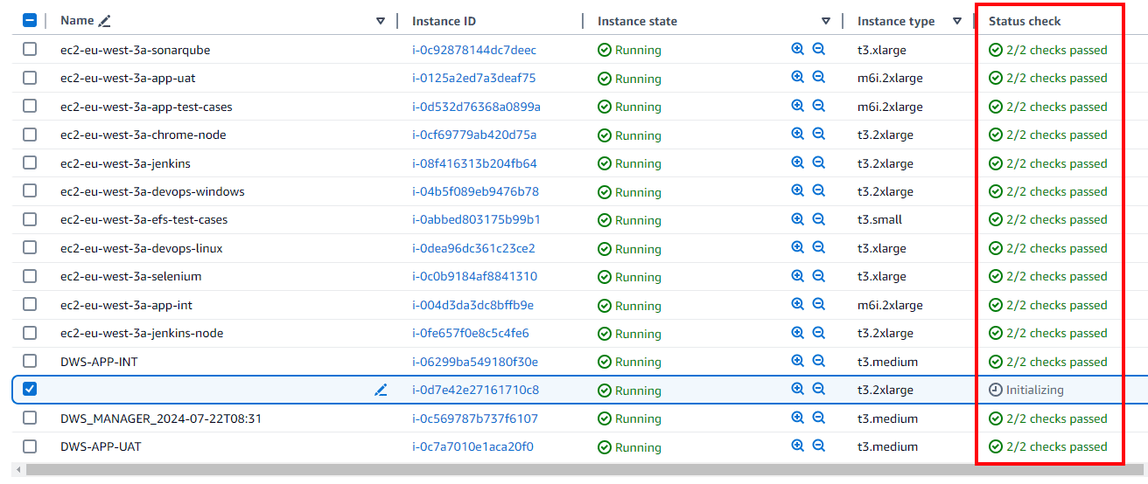
By clicking on the write icon in column “Name”, project manager can change the EC2 instance name to mark the assignee.

Reset Developer EC2 instance password
The following steps can be done by both project manager(s) and developer(s), but only explained in this manual in order to keep access controls on the instances.
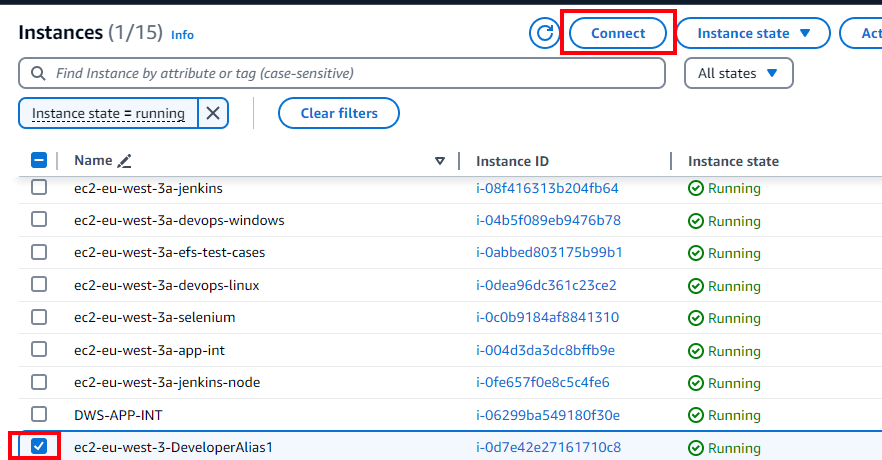
- Navigate to EC2 main page, click on “Instances” under “Instances” on the left hand side.
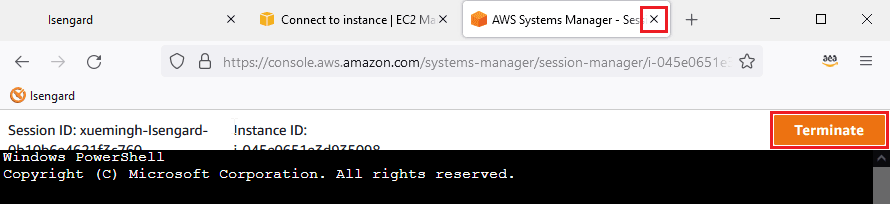
- Check the EC2 instance that needs to reset the password. Click on “Connect” button.
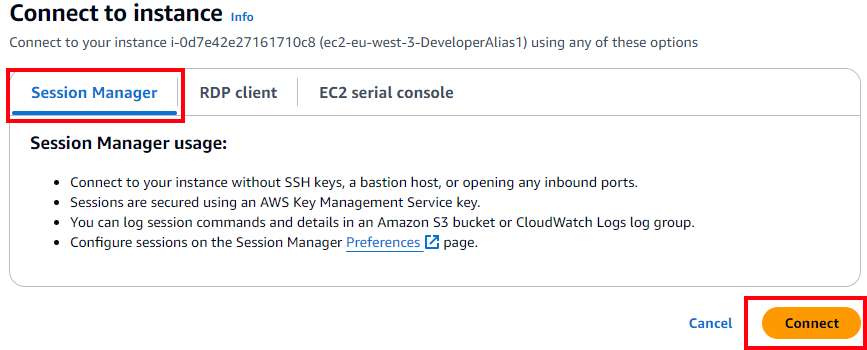
- In “Connect to instance” window, select “Session Manager” tab, then click “Connect”. A new browser tab should be created, and a PowerShell prompt is opened. This PowerShell is on the EC2 instance.
- Run command the following command to reset the password.
net user Administrator [password-to-set]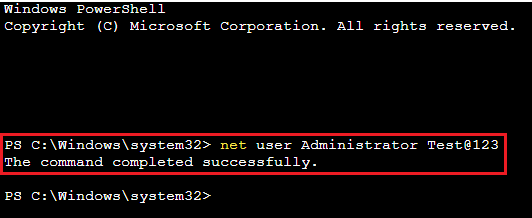
Close the browser tab, or click on “Terminate” button on top right.
Create Other types of EC2 Instance(s)
If a non-Dev EC2 instance (Dev EC2 instances are launched from Launch Templates) is required for the project, project manager can create the new EC2 instances by following steps.
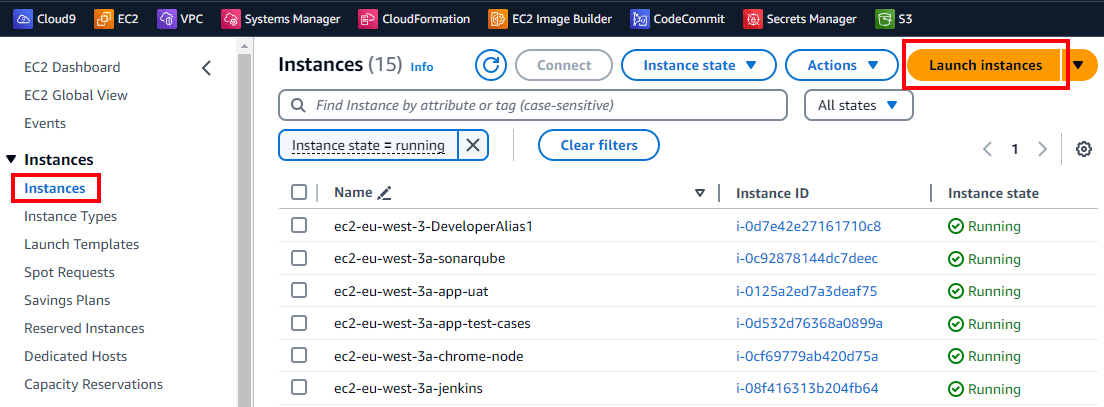
- Navigate to EC2 main page, click on “Instances” under “Instances” on the left hand side. Click “Launch instances” button.
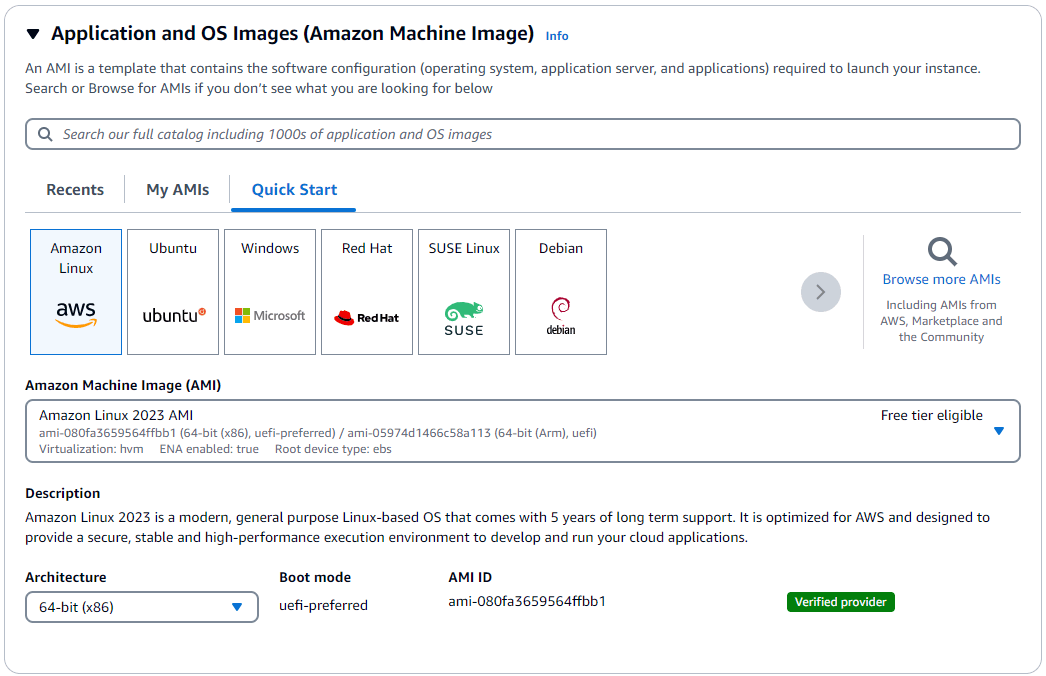
- “Name and tags” : Name your EC2 Instance using the pattern “
**ec2-<REGION>-<specificName**>” - “Application and OS Images (Amazon Machine Image)“ : select the AMI. In the screenshot below, an Amazon Linux 2023 AMI is selected for demonstration.
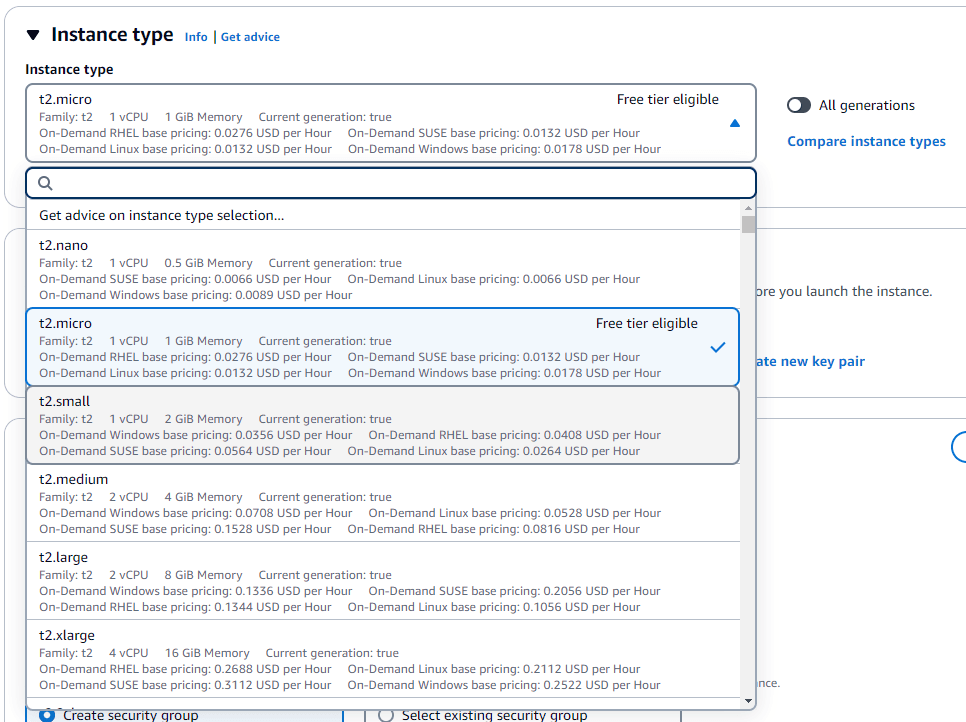
- “Instance Type” : Select desired Instance type. In the screenshot below, a t2.micro type is selected for demonstration.
- “Key pair (login)” : Select ”Proceed without a key pair“
- “Network Settings” : Configure Instance Details” page
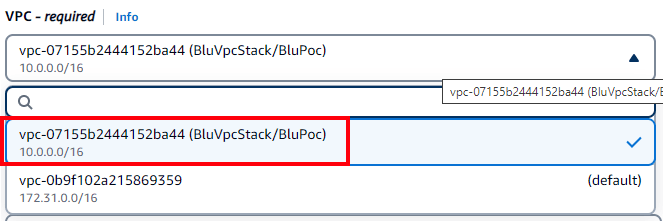
- VPC: Choose “BluVpcStack/BluPoc” as Network.
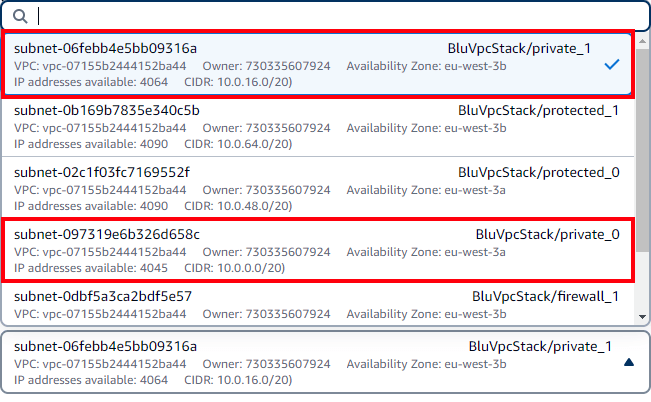
- Subnet : Choose “BluVpcStack/private0“ or “BluVpcStack/private1“ subnet as Subnet.
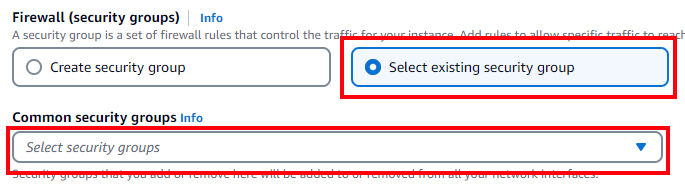
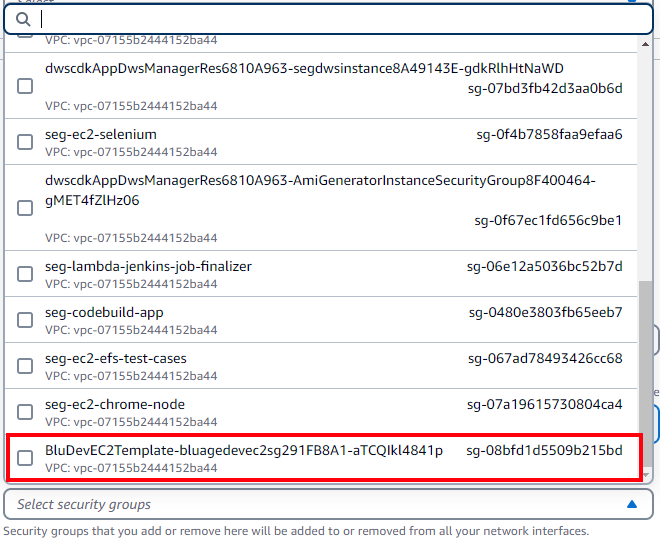
- Security Groups:
- Select “Select existing security group”.
- Choose “BluDevEC2Template-bluagedevec2sg...” security group
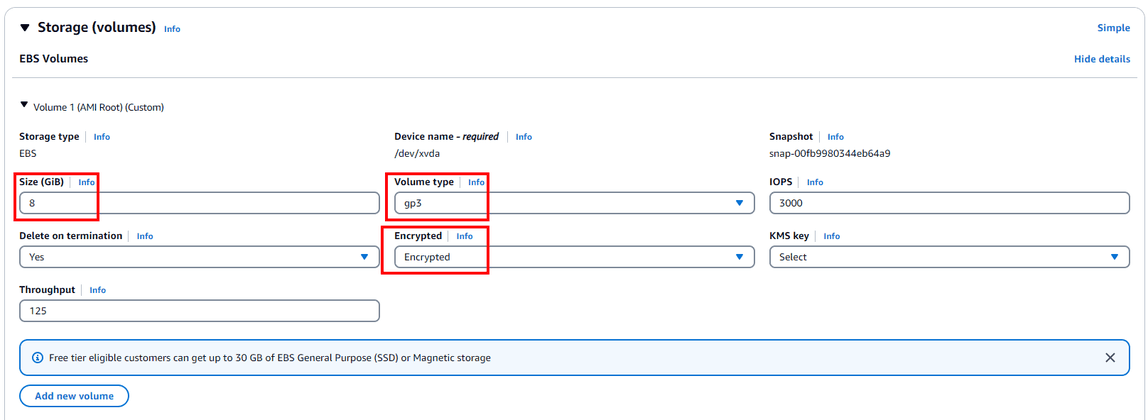
- “Storage” : choose desired disk size and Volume Type.
- Select gp3 Volume type and Encrypted EBS volume
- “Advanced Details” :
- “IAM instance profile” : select “dev-instance-profile-eu-west-3”. This role should be sufficient enough for the new EC2 instance access.
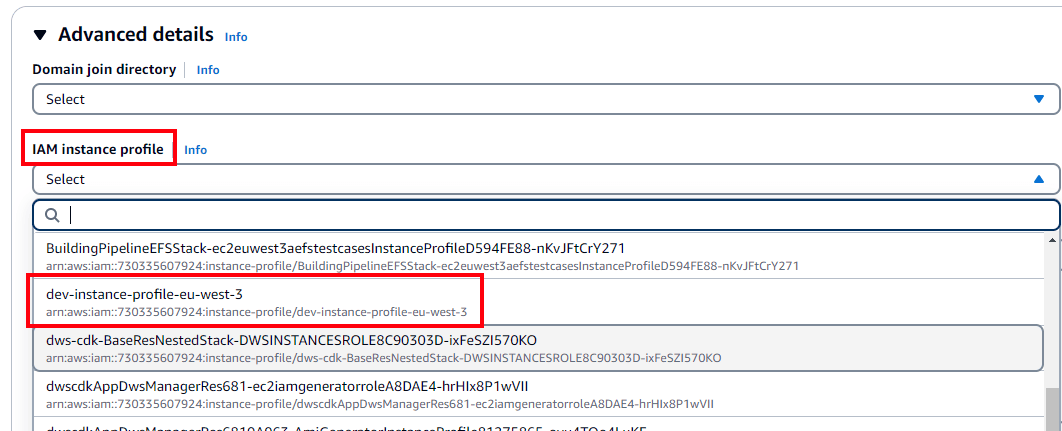
- “IAM instance profile” : select “dev-instance-profile-eu-west-3”. This role should be sufficient enough for the new EC2 instance access.
- Locate item “Termination protection”, Select “Enable” “Protect against accidental termination”. Then click “Next: Add Storage”.

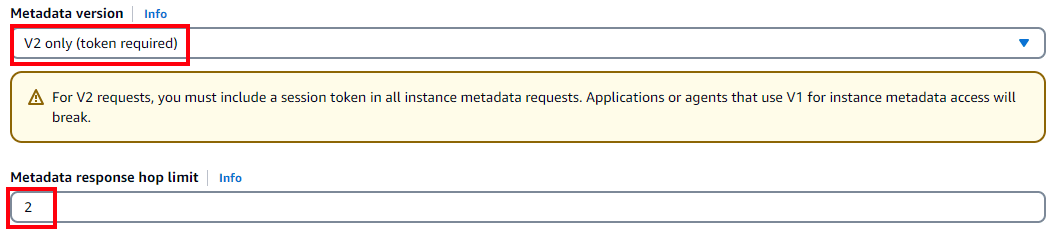
- Locate item “Metadata version”, Ensure “V2 only (token required)” is selected.
- Locate item “Metadata response hop limit”, Ensure “2” value is entered.
- Click “Launch instance”.
- Select gp3 Volume type and Encrypted EBS volume
Stop / Start / Reboot an EC2 Instance
Both project managers and developers are able to stop, start and reboot an EC2 instance.
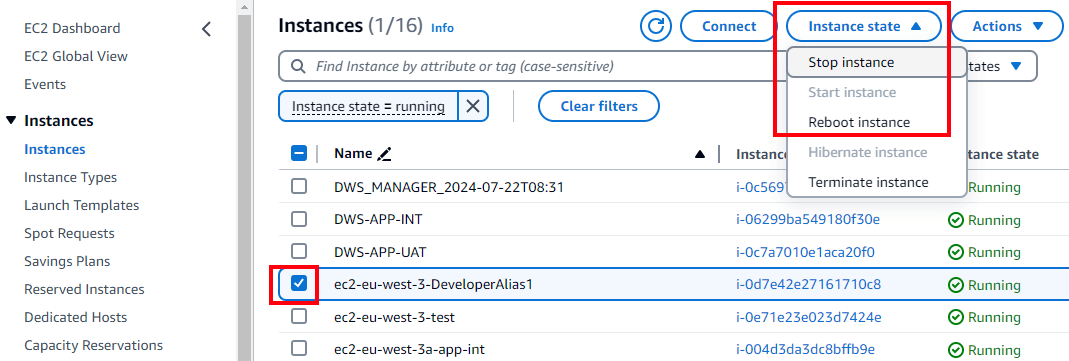
- Navigate to EC2 main page, click on “Instances” under “Instances” on the left hand side.
- Check the EC2 instance that needs to be stopped / started / rebooted. Click “Instance state” → “Stop instance”, “Start instance” or “Reboot instance” button.
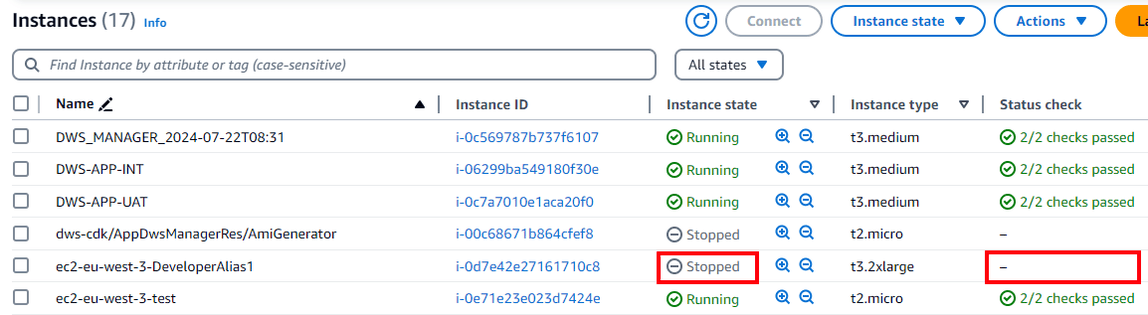
After clicking the button above, selected EC2 instance’s “Instance state” and “Status check” will change accordingly.
Terminate an EC2 Instance
As termination of an EC2 instance will remove everything on the EC2 instance, including the instance configuration, termination protection is enabled by default. Project managers need to make sure everything is Okay before terminating an EC2 instance, including but not limited to:
- During a project modernization, data are backup to another location inside the POC Landing Zone.
- Instance is no longer needed.
To unlock the termination protection:
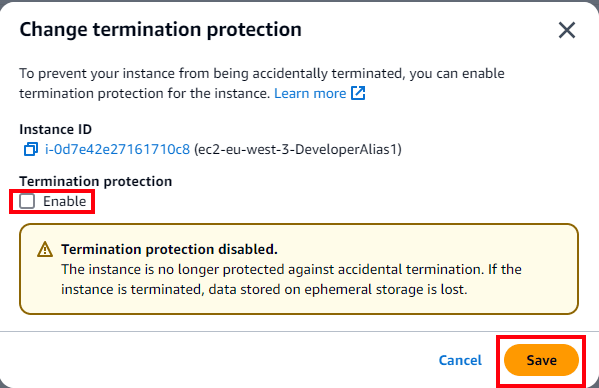
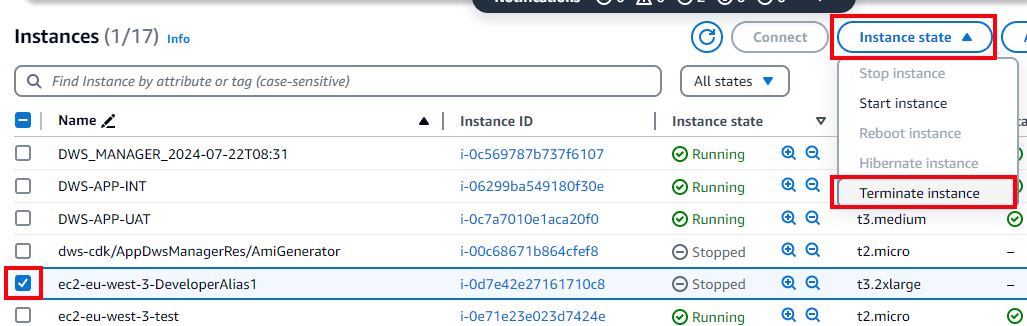
- Check the EC2 instance that needs to be terminated, click on “Actions” → “Instance settings” → “Change termination protection”.

- In “Change termination protection” window, uncheck “Enable”, then click on “Save” button.
- Check the EC2 instance, click on “Instance state” → “Terminate instance” to terminate this EC2 instance. This instance will stay in the instance list for a while with “Terminated” state, then disappear.
Update Developer Launch Templates
When customer account is created, there is one default launch template generated in EC2 Launch Templates list. This launch template uses the latest Dev EC2 AMI as the default AMI for creating Dev EC2 instances. However, new AMIs could be build based on needs, and project manager will need to create new launch template based on the default launch template. Please follow the steps below to create a new launch template version.
- In the customer account, search “EC2” in search box, and navigate to EC2 page.

- On left hand side, click on “Launch Templates” under “Instances”.
- In “Launch templates” window, click the launch template ID that needs to be updated.

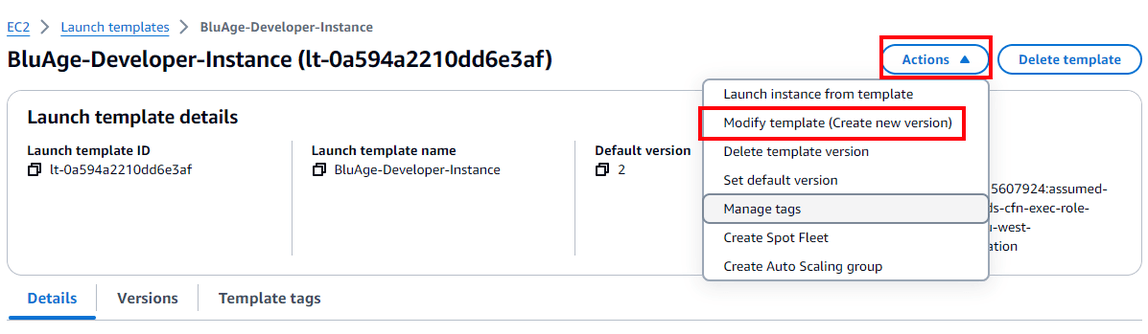
- In the launch template detail page, click “Actions” → “Modify template (Create new version)”.
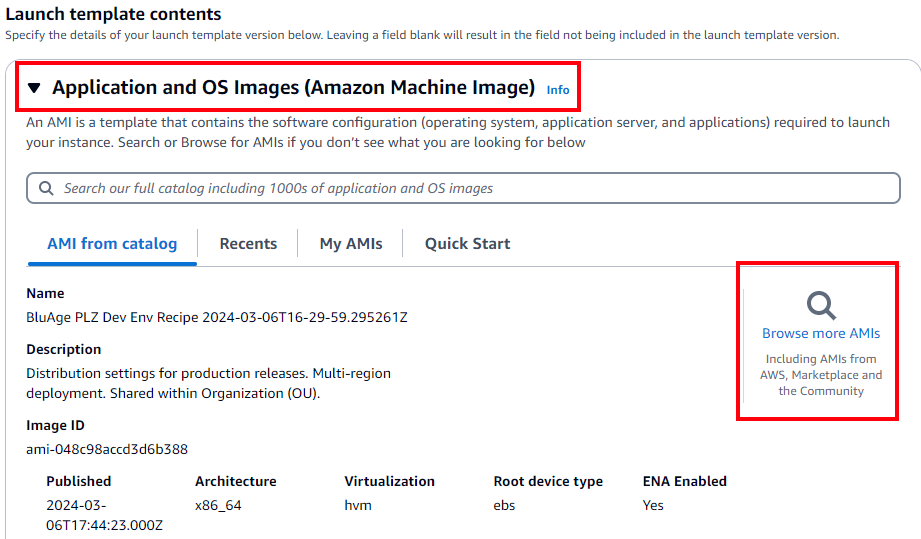
- In “Modify template (Create new version)” page, find “Application and OS Images (Amazon machine Image)”, and expend it. Click “Browse more AMIs”.
- In “Choose an Amazon Machine Image (AMI)” page, click “My AMIs” tab.
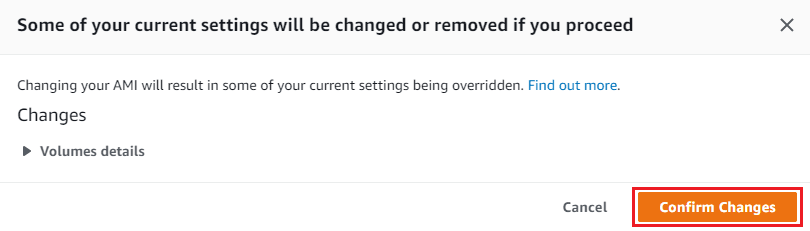
- In “Refine results” check “Shared with me” checkbox in “Owner” category, then select the new AMI by clicking “Select” on right hand side

- A pop-up window shows up and states “Changing your AMI will result in some of your current settings being overridden.”. Click “Confirm Changes” to continue.
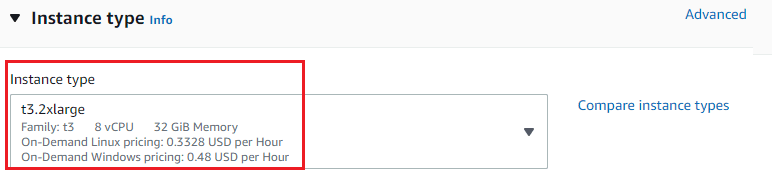
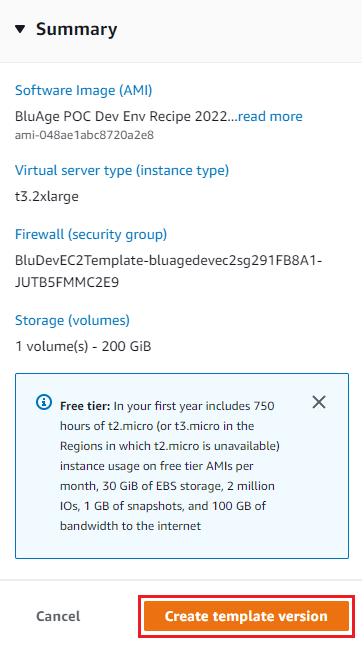
- Back to “Modify template (Create new version)” page, please make sure the following are selected:
- Instance type: t3.2xlarge
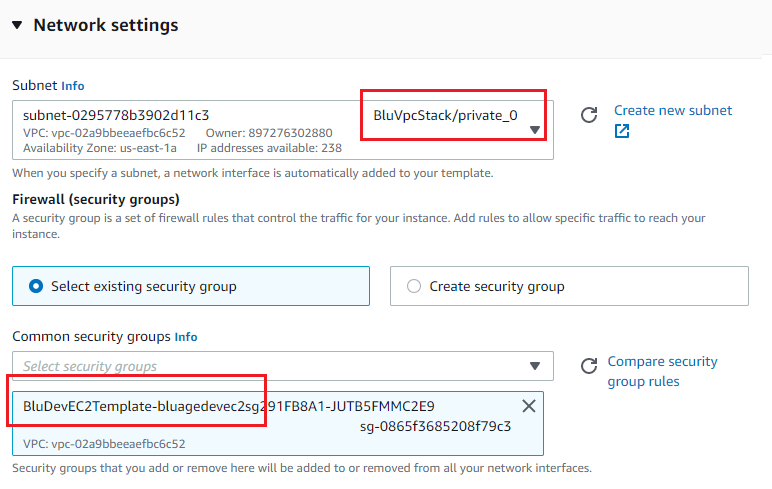
- Network Settings
- Subnet: BluVpcStack/private_0 (here any of the private subnet can be used)
- Common security groups: BluDevEC2Template-bluagedevec2sgxxxxxxxx
- Configure storage: 200 GiB gp3 Root volume

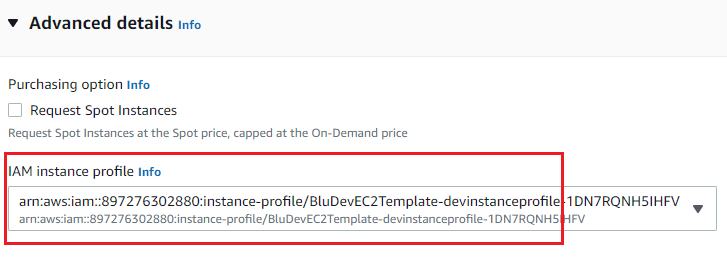
- Advanced details
- IAM instance profile: BluDevEC2Template-devinstanceprofile-xxxxxxxx
- Click “Create template version” in “Summary” on right hand side.
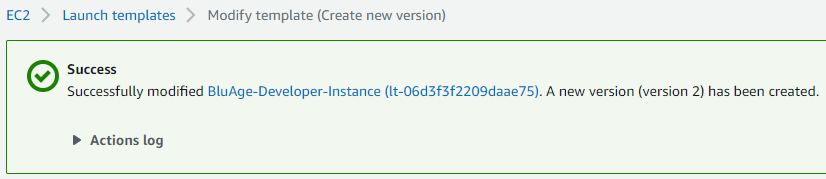
- When the new launch template is created, a “Success” message will show up.
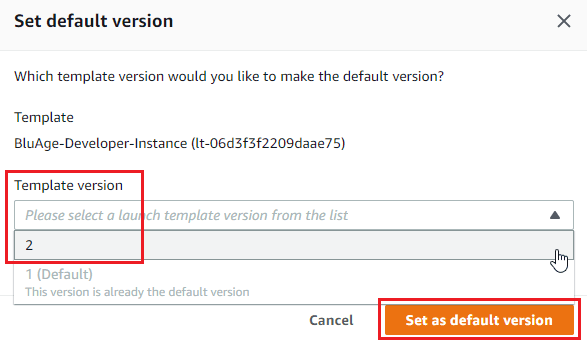
- Navigate back to “Launch Templates” page, and click on the launch template ID (Same as step 3).
- In the launch template detail page, in “Details” tab, click “Actions” → “Set default version”.

- In “Set default version” window, select the new version number (in this example, version 2 is the newly created version), then click “Set as default version” button.
- IAM instance profile: BluDevEC2Template-devinstanceprofile-xxxxxxxx
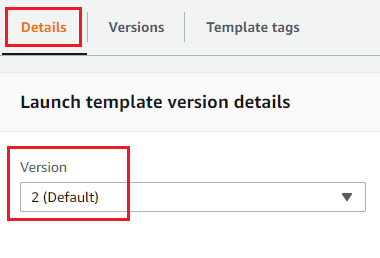
- Back to launch template details page, in “Details” tab, the default version should be change to the version selected in step 14. When project manager creates a new EC2 instance from launch template, the EC2 instance will use the new AMI.
Automated Start/Stop EC2 Instances
Managing EC2 Instance can be cost effective if resources are always up.
The aim of this document is to give some mechanism based on a AWS Lambda to fully schedule some resources to Start/Stop with minimal parameters.
Architecture
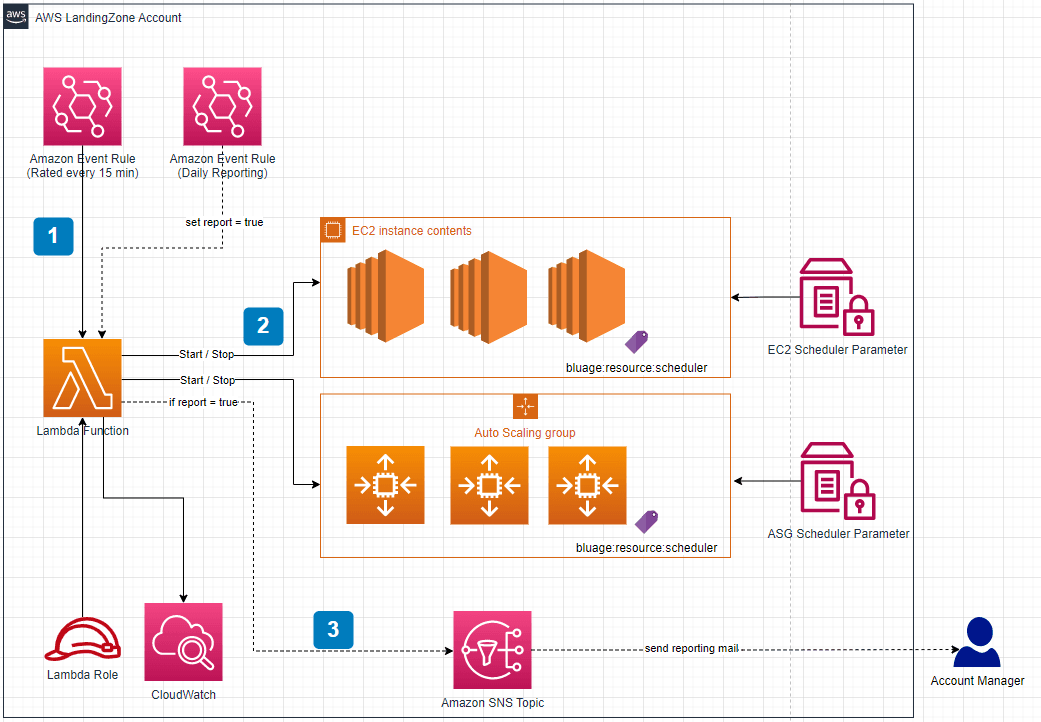
Lambda Processing
Implementation of a solution to be deployed on all LZs that makes it possible to Start/Stop AWS resources in a certain category (based on labels) at a given time.
For now, the Lambda is able to manage 2 kind of resources:
- EC2 Instances
- ASG clusters
1 - The Lambda is triggered by an EventBridge Rule scheduler.
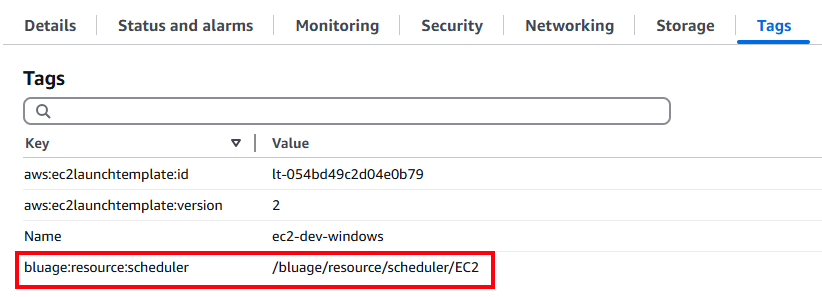
2 - The Lambda will iterate on all resources having the specific Tag and check for current day if the resource have to be started or stopped. This configuration action is define by the value of the parameterStore specified by the Tag and must respect Scheduler configuration format.
All the resources having the Tag key “bluage:resource:scheduler”: AWS Transform for mainframe - Landing Zone - Start/Stop EC2 Instances - User Guide will be processed.
For example, if the scheduler is set with a start at 9am and a stop at 7pm, then:
- If the lambda process an EC2 at 7:15pm with this configuration, then the EC2 will be stopped
- If the EC2 is restarted manually after 7pm, the lambda will stop the instance again at next EventBridge triggers
If the user needs to do additional work outside of the intended scheduler, it is possible to prevent the EC2 from automatically shutting down. Check Prevent the EC2 instance from stopping automatically
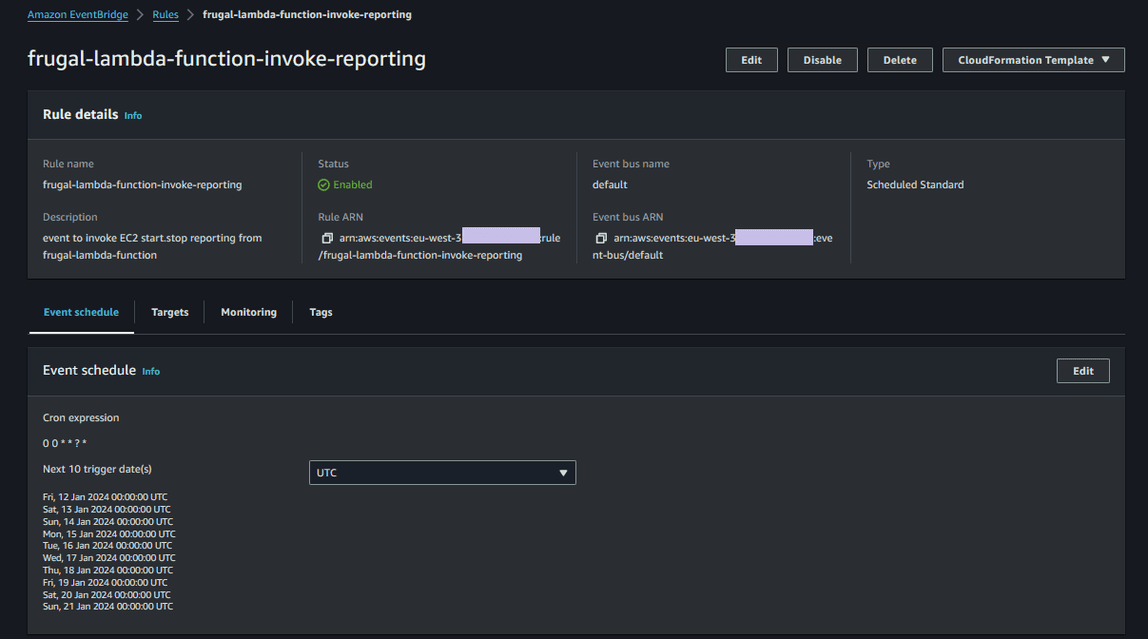
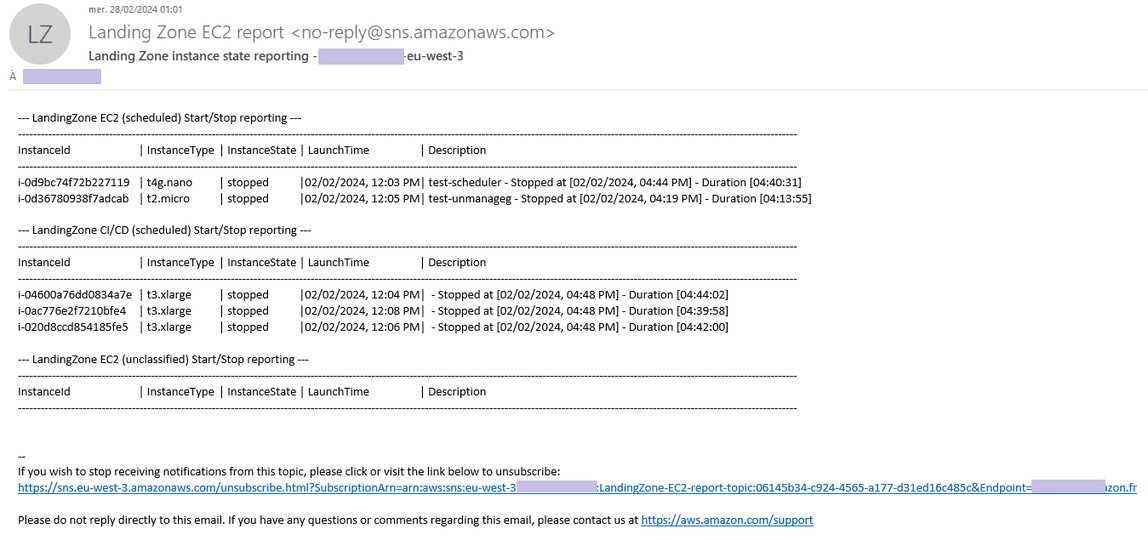
3 - At the end of the day, a report is sent by mail to the Account Manager. This report will display the state of all the account resources
To get mail, you need to opt-in the Topic Subscribe to the daily EC2 status reporting
EventBridge Rule scheduler
There is 2 different rules that trigger the Lambda:
- The EventBridge Rule for Start/Stop instances command. This scheduler is a fixed rate schedule pattern and is set by default to 15 minutes.
- The EventBridge Rule for reporting. This scheduler start every day at midnight (default setting)
Resource Tag
bluage:resource:scheduler
This Tag must be apply on all resources you want to schedule with Start/Stop command.
The Tag can have multiple values. The most common way to use it, is to fillup the Tag Value field with a ParameterStore key value.
The ParameterStore key/value must comply with the Scheduler configuration format
Scheduler configuration format
The parameters have to verify this expectation:
- Key Name must start with this prefix label:
bluage:resource:scheduler
- Key Value is a json string format and must follow this pattern:
[key in Day]?: [start: string, stop: string] | 'stopped'
- the Day value can have
- a
start/stopkey pair value - “
stopped” value to force stop all that day long. - “
disabled” the scheduler will not perform any action on the resource for the entire day.- If the resource is started, it will remain started.
- If it is stopped, it will remain stopped
- a
- the start value specify the resource start behaviour, it can be
- “
HHMM” format as “0600” - “disabled” if restart isn’t needed
- “
- the stop value specify the time at which the resource must stop, it can be
- “
HHMM” format as “2100” - “disabled” if stop isn’t needed
- “
{
"Mon": ["0600", "2200"],
"Tue": ["0600", "2200"],
"Wed": ["0600", "2200"],
"Thu": ["disabled", "2200"],
"Fri": ["0600", "2200"],
"Sat": "stopped",
"Sun": "stopped"
}
Note: All the date time must be in UTC Timezone format and given by a four characters format “HHMM” (e.g. “0655”)
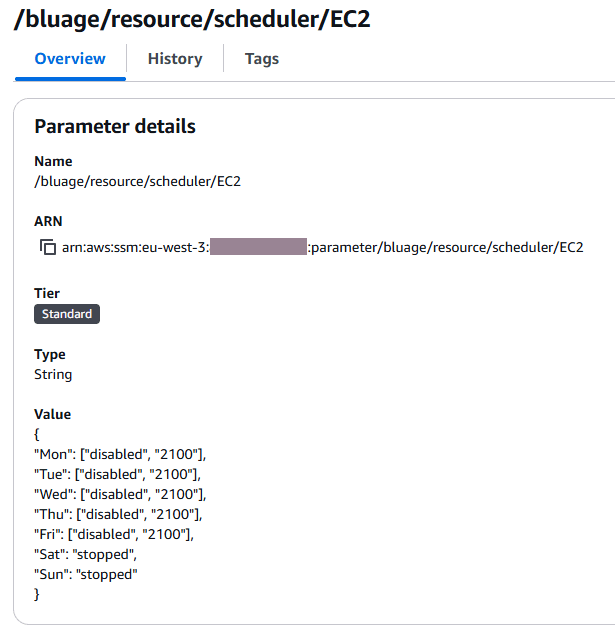
For instance, for EC2 resource, we set up a /bluage/resource/scheduler/EC2 parameterStore key as follow:
Configure lambda to a specific timezone
By default, the lambda use UTC to manage the scheduler Start/Stop processing.
The lambda can be setup to comply a specific timezone. To do so, it’s necessary to fill up the lambda environment variable “TZ”.
Go to the lambda console, then in the “configuration” tab click on the environment variables. Check the “TZ“ environment variable. If there is no value, the default UTC timezone will be apply.
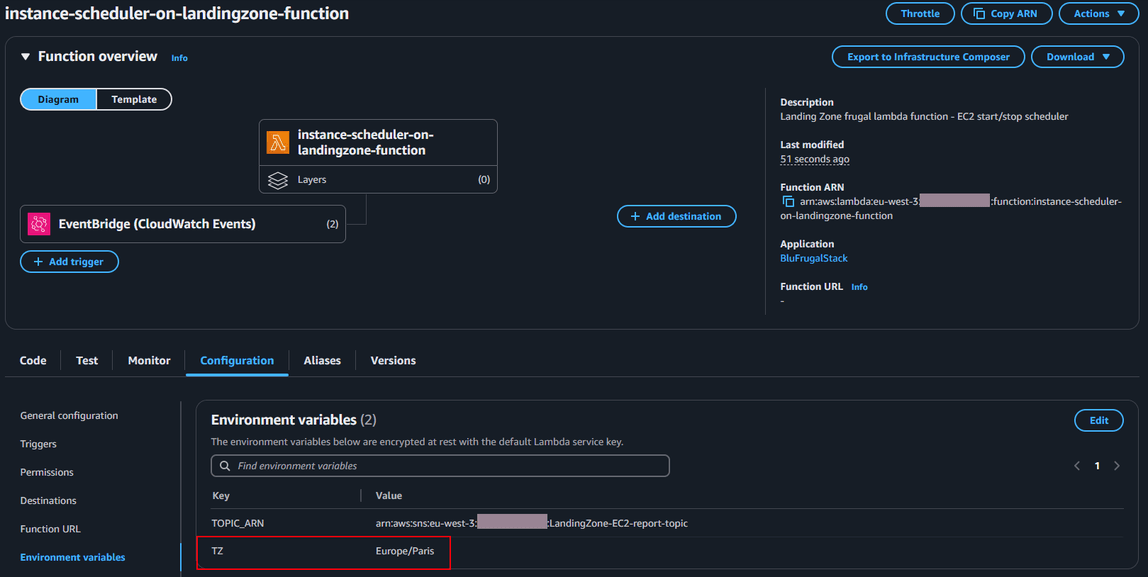
To configure a french timezone, simply fill up the “TZ” value with “Europe/Paris”.
A more exhaustive timezone values can be found here
Use a custom Scheduler parameters
You can add your own scheduler to manage specific resources. This functionality allows you to group resources managed by a scheduler. This can be useful if some users work in different hours
For this, just add a new parameterStore
- with a key witch has to start with the “
/bluage/resource/scheduler” prefix - For example:
/bluage/resource/schedule/EC2-server-1 - with a value that comply with the Scheduler configuration format
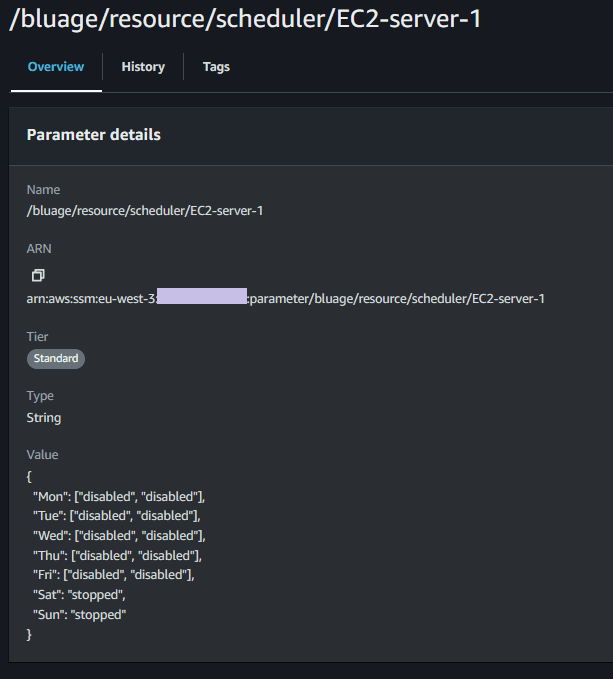
Then set the new tag value to the resource you want to add the custom scheduler parameterStore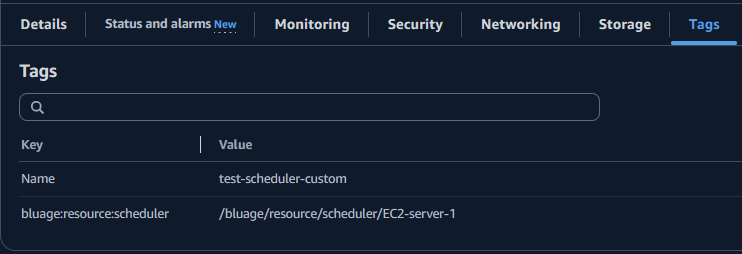
Prevent the EC2 instance from stopping automatically
If someone needs to use its EC2 instance outside the scheduler range. It’s possible to disable the stop instance state process.
For that you have to enable the stop protection on the specific instance
Enable Stop protection
aws ec2 modify-instance-attribute \
--instance-id <instance-id> \
--disable-api-stop
Disable Stop protection
aws ec2 modify-instance-attribute \
--instance-id <instance-id> \
--no-disable-api-stop
Subscribe to the daily EC2 status reporting
An EventRule is provided to have project manager the ability to report daily EC2 status report.
By default, this EventRule is triggered avery day at midnight (UTC). It can be updated with a specific cron expression.
So that the project manager is notified by email of the daily report, you only have to subscribe to the reporting SNS Topic.
To do so, from the console go to the SNS Topic “LandingZone-EC2-report-topic” :
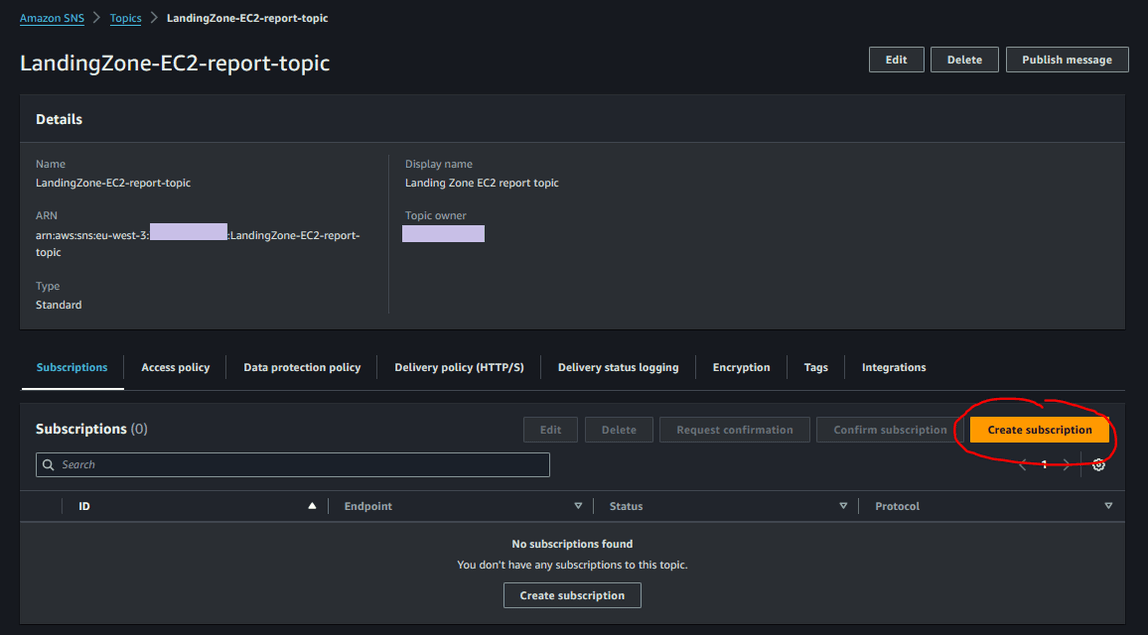
- click on the “Create subscription” button
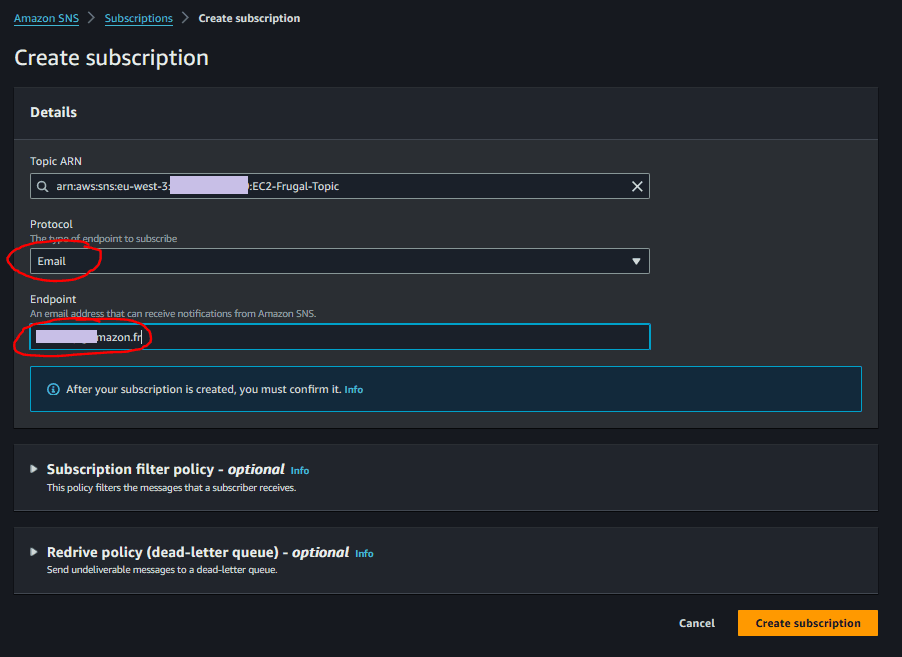
- choose the “Email“ item from the Protocol dropdown
- fill up the Endpoint field with your email
- then, click on the “Create subscription” button
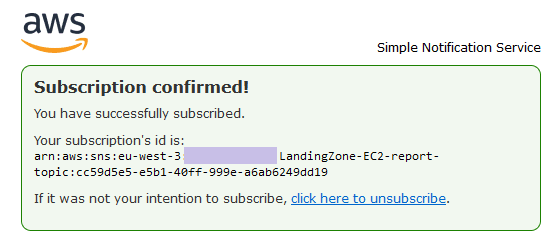
An email to confirm your subscription is sent. Just approve it then it’s done.

Reporting mail
Annex 1 - Default Scheduler parameters
The CDK frugal project provide for you some default scheduling parameters.
The scheduler parameters are set in - AWS Systems Manager > ParameterStore
/bluage/resource/scheduler/EC2
{ "Mon": ["disabled", "disabled"], "Tue": ["disabled", "disabled"], "Wed": ["disabled", "disabled"], "Thu": ["disabled", "disabled"], "Fri": ["disabled", "disabled"], "Sat": "stopped", "Sun": "stopped" }- /bluage/resource/scheduler/ASG
/bluage/resource/scheduler/ASG
{
"Mon": ["disabled", "disabled"],
"Tue": ["disabled", "disabled"],
"Wed": ["disabled", "disabled"],
"Thu": ["disabled", "disabled"],
"Fri": ["disabled", "2000"],
"Sat": ["disabled", "disabled"],
"Sun": ["1830", "disabled"]
                    }